Triglavian Invasion Combat scanning by Arkive Soikutsu
Intro
This document includes an introduction to probing and strategies specific to probing in a fleet in an invasion system. If you’re already familiar with using probes to scan down signatures, you may want to glance at ‘Setting up your filter:’, then skip to ‘Scanning strategies in invasion systems:’
Newbro-friendly probing intro
Required Skills
Astrometrics II
Required Equipment
Expanded Probe Launcher I, (Expanded Probe Launcher II and the Sisters Expanded Probe Launcher are helpful upgrades, but not required.)
8x Combat Scanner Probe I, (Sisters Combat Scanner Probes are a helpful upgrade, but not required.)
I typically carry 16 in case I forget a set when leaving system.
Opening The Probe Scanner Window
Press Alt+P or use the scanners button on the left of the HUD to open the Probe Scanner window:


If your Probe Scanner window is docked in your Solar System Map window, I’d recommend you undock it. It’s often helpful to have the Probe Scanner window and Directional Scanner (D-scan) window open without the Solar System Map taking up most of the screen

Setting up your filter:
Invasion systems tend to be busy systems. Setting up a filter can help streamline finding Triglavian ships and helps avoid lag.
Create a new filter
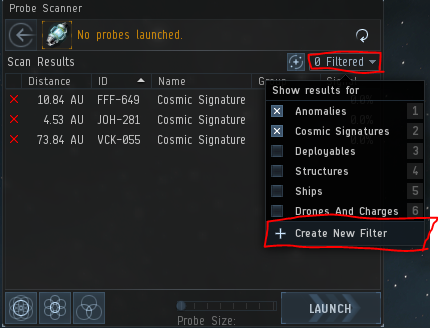
Select Invading Precursor Entities (These are the Triglavian ships you’re looking for.)
Optionally, select the Retaliating <Faction> Entities groups. (Useful if your group is looking for NPCs to save.)
Remember the more groups that are enabled, the more cluttered the scanning view will be.
Name and save the filter

Using filters:
From the filter drop-down select your new filter.

The default filters should generally be disabled but they can have uses in invasion systems
Anomalies
Roaming fleets generally avoid the combat site anomalies
Site fleets sometimes have to deal with opponents dragging the Triglavians hundreds of km from the site spawns
Cosmic Signatures
Scanning down wormholes can be useful for ingress/egress to island or gate-camped systems
Deployables
MTU hunting to deter salvagers/looters
Ships
Finding fleets, even at safe-points
Drones and Charges
Finding salvagers
Recovering lost/abandoned drones
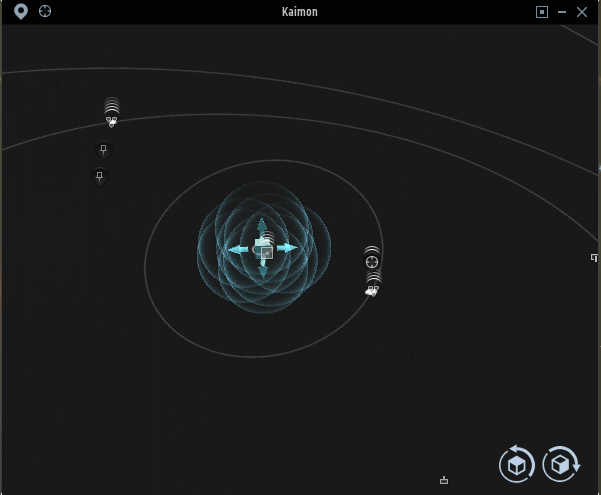
Opening the Solar System Map window:
This is a 3-D representation of the current system. Probers spend a lot of time with this window. It can be opened from the Probe Scanner window, from the Scanner Button on the left of the HUD, or with F9.

This is the probe scanner window
Navigating the Solar System Map:
Panning
right-click and drag
Rotating
left-click and drag
Zooming
mouse wheel
Center on Object
double-click object
Toggle Top-view/Side-view
double-click empty space
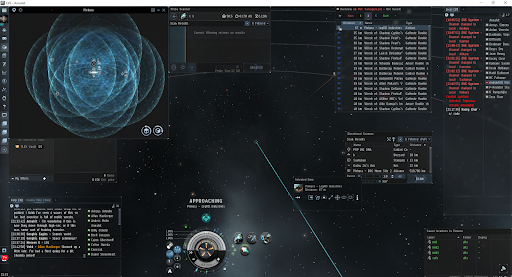
Launching Probes:
Probes can be launched from the HUD, from the Probe Scanner window, or with B


Once launched, you’ll see a blue cube with arrows inside overlapping spheres. This represents your cluster of probes.
Moving the probes:
Dragging a cube face will move your probe formation in the face’s plane
Dragging an arrow will move the probe formation along the arrow’s axis
Remember, space is 3-dimensional. You will need to rotate the view to make sure the probes are positioned correctly.
Resizing the probes:
Large probe coverage size (the blue spheres) can cover more space but at a reduced strength
Small probe coverage size will have an easier time pinpointing the location
Probe coverage size can be adjusted with the Probe Size slider in the Probe Scanner window, or with alt+mouse wheel

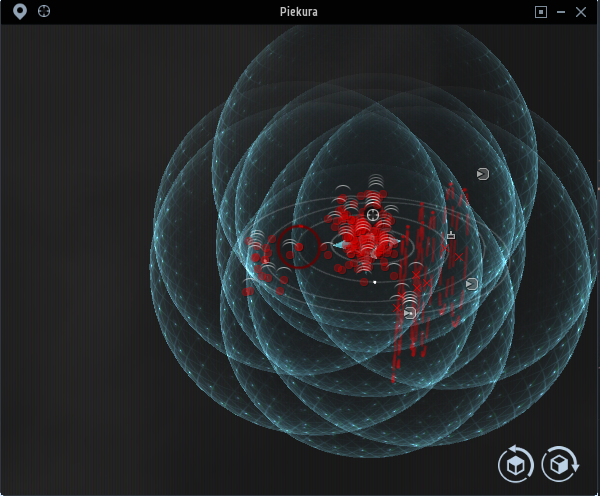
Finding a scan result:
Center the probe formation on the sun
Set the probe size large enough to cover the system

Start the scan with the analyze button in the Probe Scanner window, or B
Once the scan is started, the probes will take a few seconds to warp to position, and then another few seconds to actually scan
Once the probes are done scanning, you should have some results in the Probe Scanner window. (unless there are 0 Triglavian npcs in system)
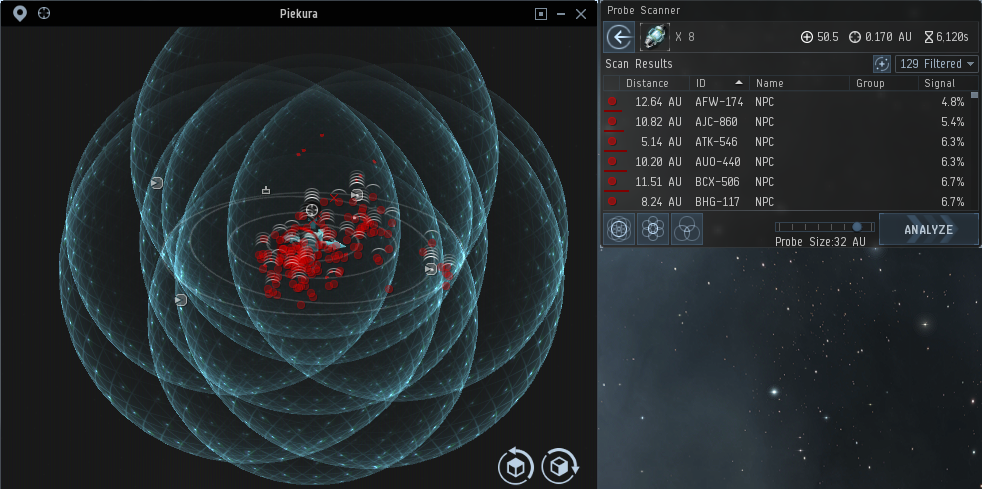
Narrowing down a location:
Double-click a signature in the Solar System Map window to center the view. A circle will appear around the selected signature.
Center your probe cluster on the selected selected signature. Remember this is a 3-dimensional space. Rotating the view (or toggling between top and side views) will help make sure your probes are correctly positioned.

Reduce the probe size by 1 step and scan again

Repeat the move probes, reduce probe size, scan loop until the circle is filled (signal reaches 100%)
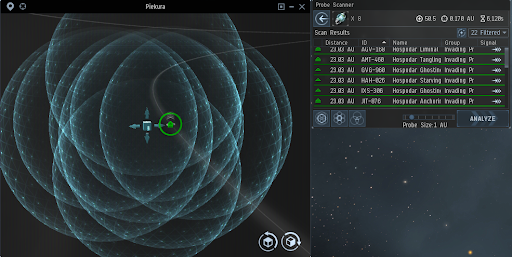
Now that the ship has been scanned down, you know exactly where it is. In this case, there’s a fleet of Hospodar Triglavians at Piekura X – Asteroid Belt 1

If you can’t reach 100% signal, even with precise positioning of probes at 0.5 AU size, then you need to increase your scan strength through skills, modules, rigs, or implants. *Even low scan-strength characters can be useful for finding roaming fleets. See D-Scanning or Approximating Roamings.
Dealing with spheres, circles, and lines:
Sometimes, instead of a red point, you’ll see a red sphere, red dotted circle, or red dotted line. The same general idea of centering probes and reducing size applies, but specific advice follows:
Sphere:
Center the probe cluster on the center of the sphere. Choose the smallest probe size that covers the sphere.

Circle:
Center the probe cluster on the center of the circle. Choose the smallest probe size that covers the circle.

Line:
Center the probe cluster on one of the endpoints of the line. Choose a probe size that covers at least half the line, but doesn’t include both endpoints.

If the signature’s signal drops to zero, then move to the other endpoint
Scanning strategies in invasion systems:
Staying safe while scanning:
Stay tethered at a dockable structure
Be mindful of people trying to bump you out of tether range. Approach or orbit the structure to make bumping you more difficult
Stay cloaked
Be mindful of decloak distance. Keep your ship or your active modules visible to keep an eye on cloak status
Warp with the fleet
Be mindful to broadcast when being targeted. Listen for the target lock sound. Keep your overview visible. Either bind the broadcast to a hotkey or keep your fleet window visible.
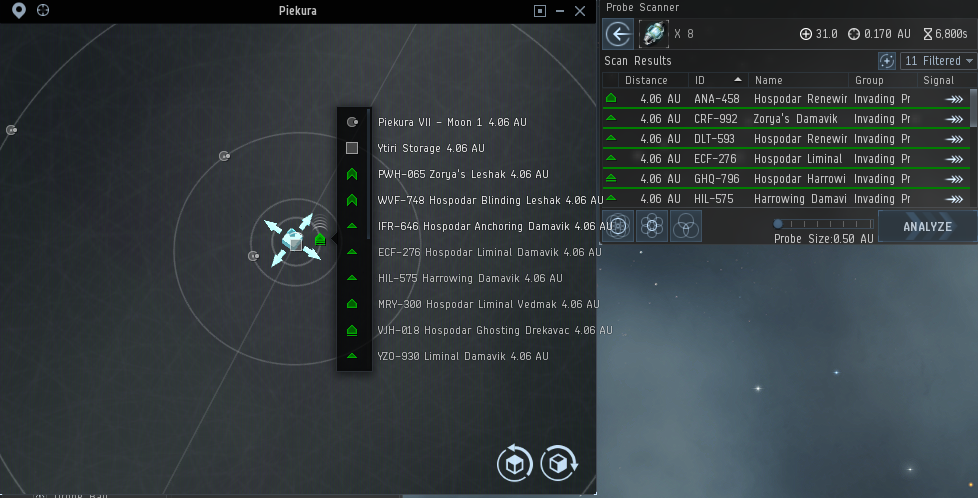
Narrow scan on a celestial cluster:
Unless they’re in warp, the npcs will be clustered around a celestial, station, or structure. So instead of starting with a wide probe size and narrowing down, we can start with the smallest size, and scan clusters of celestials one at a time.
In this example, the planet has 4 moons and 2 stations in orbit, all of which fit in a 0.5 AU sized probe clustered

Move the small probe cluster over the planet and scan. In this case, I found a fleet at the Ytiri Storage station
Approximating roamings:
Even if you don’t have the scan strength to pinpoint an exact location, approximations can be helful as well.
In the example below, I’ve found a cluster of Triglavian signatures around a planet with 4 moons. From this I can tell, the fleet is either at the planet, moon 1, or moon 2.
Since we’ve narrowed it down to a few locations, you, another scout, or even your fleet could warp to one of the possible locations, then narrow it down further by either warping to each possibility, or using D-Scan

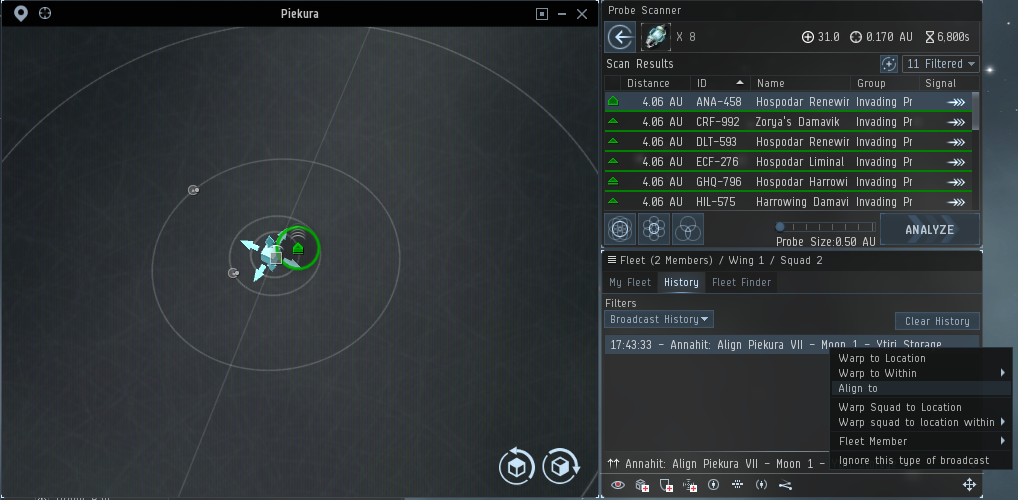
Communicating with your fleet:
Now that you’ve found a Triglavian fleet , you need to communicate the location to your own fleet. Each Fleet Commander (FC) runs things a little differently, but here’s some general pointers
Broadcast: Align to
While in a fleet, if you right-click on a celestial, station, or structure, you can choose ‘Broadcast: Align to’
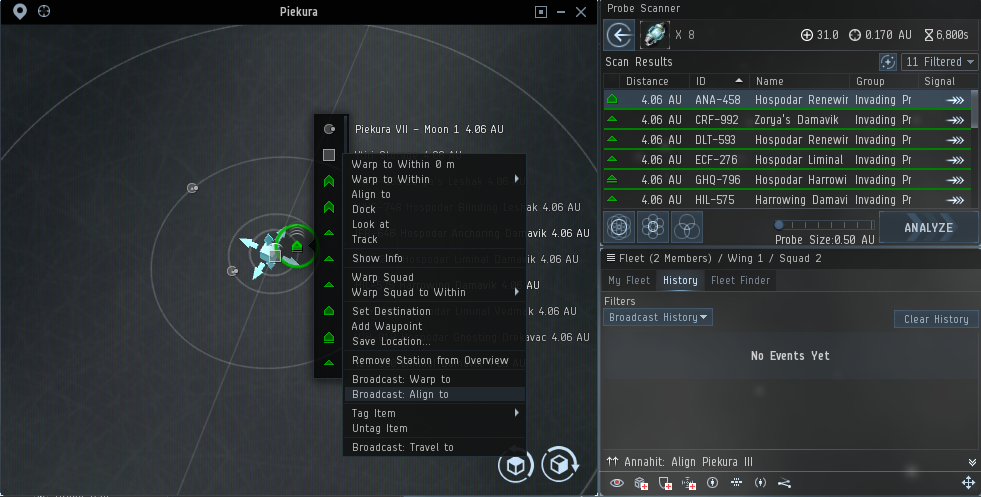
This will show up in your squad’s Broadcast History in the Fleet window. From there, other squad members can right-click the broadcast and align to it or a commander can right-click the broadcast and warp the fleet to it.
This has the advantage of not cluttering voice comms and you don’t have to warp there in advance
Unfortunately, you can’t broadcast a signature (or a bookmark)
Squad warp
Some FCs prefer to put probers as squad or wing leaders so the prober can warp the squad directly to a signature
Right click on a signature as a squad leader and choose ‘Warp Squad/Wing’

This has the advantage of warping the squad onto the signature, and doesn’t require a nearby celestial or station
This puts a little more responsibility on the scanner. Make sure to coordinate fleet warp prep. (Drones in, reload guns, etc.)
Keep in mind your squad composition. You don’t want to warp a sniper squad at 0km.
Warp-ins
In some cases probers will warp themselves to the signature, then the fleet will warp to the prober.
This has the advantage of getting the fleet directly to the signature without needing a nearby celestial or station
Unfortunately, this puts the prober alone, on-grid with the Triglavian fleet before the friendly fleet arrives. Some options on doing this safely:
Cov-Ops cloak
Cov-Ops cloaks allow you to warp while cloaked. (Triglavian NPCs have target lock ranges over 1000km, so even if you warp to 100km, the Trigs may target lock you before you get a regular cloak up.)
Cloaks break if you get closer than 2000m of any object. It’s generally not difficult to keep that range on the Trigs if you warp in cloaked at range, but you’ll want to take care when warping into an asteroid belt or having the fleet warp onto you.
To prevent your fleet from breaking your cloak use one these tactics:
Ask the commander to fleet warp onto you at range
Ask the commander to alert you when they initiate warp. Once the fleet warp is initiated, you can warp away and the fleet will continue warping to your previous spot.
Fast, agile ship
A fast agile ship should be able to warp in at 100km, then turn around and burn away from the Trig fleet with a prop mod. Unfortunately, the Damaviks max out at 4000 m/s, so you probably won’t be able to outrun a fleet indefinitely. *I haven’t personally attempted this yet, so anyone with experience may be able to weigh in here.
Increasing scan stats:
Skills
Astrometrics
+5% strength, -5% deviation, -5% duration per level
required for other scanning skills
recommend IV to unlock Astrometric Pinpointing
Astrometric Rangefinding
+5% strength per level
required for Scan Rangefinding Array I module
recommend II to unlock the module. Higher for dedicated scanning characters
Astrometric Acquisition
-5% duration per level
required for Scan Acquisition Array I module
recommend II to unlock the module
Astrometric Pinpointing
-5% deviation per level
required for Scan Pinpointing Array I
Ships
T1 exploration frigates
Magnate, Heron, Imicus, Probe
+7.5% strength per frigate level
T2 CovOps frigates
Anathema, Buzzard, Helios, Cheetah
+10% strength per frigate level
T3 Strategic Cruisers
Legion, Tengu, Proteus, Loki
-99% CPU requirement for Probe Launcher
Covert subsystem gives +10% strength per level
Ship Rigs
Gravity Capacitor Upgrade I
+10% strength
Gravity Capacitor Upgrade II
+15% strength
Signal Focusing Kit I
-15% duration
Signal Focusing Kit II
-20% duration
Ship Modules (Mid slots)
Scan Rangefinding Array I
+5% strength
Scan Rangefinding Array II
+10% strength
Scan Acquisition Array I
-10% duration
Scan Acquisition Array II
-20% duration
Scan Pinpointing Array I
-10% deviation
Scan Pinpointing Array II
-20% deviation
Implants
Poteque ‘Prospector’ Rangefinding
Slot 8
+2%, +6%, or +10% strength
Poteque ‘Prospector’ Acquisition
Slot 7
-2%, -6%, or -10% duration
Poteque ‘Prospector’ Pinpointing
Slot 8
-2%, -6%, or -10% deviation
Useful Resources:
EveUni probing tutorial – step by step probing down a signature with pictures
Alebrelle’s Probe Scanning Basics – Video guide to basic probing
Abyssal NPC spreadsheet – Google sheet. ‘Invading Precursor Entities’ tab has stats on Trig ships